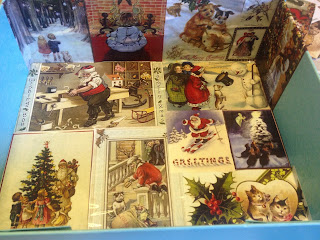
My first step was to find the pictures. I did an online image search of "vintage Christmas" and "Victorian Christmas". I pasted them all into a Publisher document, converted it to a PDF and printed them off.
The second step was to cut the images out. There were 10 sheets of pictures for each box and to stop me getting in a muddle I kept the cut outs for each box in a plastic wallet.
When it was time to start decorating I gathered my small list of supplies; pva glue, paint brush, images and the box.
I found it helpful to sort the pictures into sizes as it made things easier when decorating the boxes. I also put images I particularly liked at the top of the pile so they'd definitely be used.
The decorating was really simple. Using the brush I painted on some glue and put an image on top. I then went over the image with additional glue to smooth it out and get rid of any lumps and bumps.
Ensure your images go right into the corners and edges of the box.
Don't worry if you get some wrinkles, you can smooth them out with additional glue when the first layer has dried slightly.
Getting a good layout can be tricky at times and I found it helpful to put the images on without any glue to see how they look next to each other and then I'd take a photo so I could refer to it.
Keep on gluing until you've covered the whole box. You'll have to take breaks so the glue can dry in places before moving on to the various sides of the box but eventually you'll have a box completely covered in vintage images.
We know how many goodies She Said Beauty pack into the boxes each month so you can fit a lot inside. I'm using them as Christmas presents that I'll be filling with all kinds of surprises. It's better than going into a shop and spending money on massed produced packaging. While I'm excitedly counting down the days to Christmas when I can give them to my friends I'm using them to store my ribbons, gift tags and other bits and pieces that I use for wrapping gifts.
In terms of monetary cost, these boxes are incredibly thrifty for something that is one of a kind. The glue was £1.50 and will be more than enough to do all 6 of the boxes I'm making, the paintbrush was £1 and the boxes were free. I printed the images at home but to try and put a cost on it, where I work charges 3 pence for each page of colour printing and there are 10 pages so that works out as only 30 pence per box. In total it will have cost me £4.30 for all 6 boxes - less than a pound each! Even if they were triple the cost it would still be worth it and your friends who receive one will know that you've taken the time and effort to hand craft them a one-off present.


What a lovely idea. xx
ReplyDelete